Photoshop quick tip: how to brighten portraits and preserve skin tones in two minutes
Dec 22, 2017
Dunja Djudjic
Dunja Djudjic is a multi-talented artist based in Novi Sad, Serbia. With 15 years of experience as a photographer, she specializes in capturing the beauty of nature, travel, and fine art. In addition to her photography, Dunja also expresses her creativity through writing, embroidery, and jewelry making.
Share:
Photoshop quick tip: how to brighten portraits and preserve skin tones in two minutes
Dec 22, 2017
Dunja Djudjic
Dunja Djudjic is a multi-talented artist based in Novi Sad, Serbia. With 15 years of experience as a photographer, she specializes in capturing the beauty of nature, travel, and fine art. In addition to her photography, Dunja also expresses her creativity through writing, embroidery, and jewelry making.
Share on:

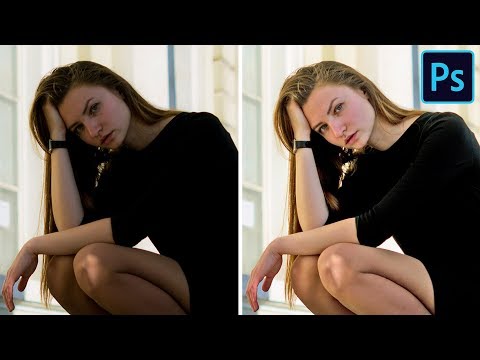
When you shoot some underexposed photos, brightening them up is usually not too much of a problem. However, making portraits brighter can result in desaturated, unnatural skin tone. In this quick tutorial, Aaron Nace of PHLEARN shows you how to brighten up a portrait and keep the skin tones saturated and natural-looking. And you can do it all in only two minutes.
Start by opening the portrait you want to edit and duplicate the background layer. The photo Aaron is editing has a bright background, but the model is dark, and he only wants to brighten up his subject.
For starters, go to Image > Adjustments > Shadows/Highlights. You have a lot of control over the shadows and highlights here, and for this purpose, you should increase the amount, tone and radius of the shadows. Also, bring the color up a bit, and this will increase the saturation in the shadows.
Adjusting Shadows/Highlights has done the most of the work, but now you need some fine tuning, such as adding contrast to the shadows and fixing the color.
Start by adding a Curves adjustment layer and drag the curve upwards to brighten the image. Press Ctrl/Cmd + I to invert the layer mask, and then just paint white with the brush over your subject. This will brighten up the entire subject, but you want to focus only on the highlights. To fix this, double-click on the Curves adjustment layer and go to Blend If. At the Underlying Layer, hold down the Alt/Option key and click and drag from left to right. This is going to focus the Curves adjustment layer only yo the highlights and the shadows will remain dark.

The last step is refining the color of the model’s skin. Choose a new Hue/Saturation adjustment layer and bring the saturation up just a little bit. Now, to target the skin tones, add a Selective Color adjustment layer, choose “Reds” and adjust it to add more natural color to the skin tone.
And that’s about it. Although you need a few different adjustment layers, this technique is still pretty fast, yet gives good results. And for comparison, here are Aaron’sisfore and after.


[How to Brighten Portraits in Only 2 Minutes in Photoshop | PHLEARN]
Filed Under:
Tagged With:

Dunja Djudjic
Dunja Djudjic is a multi-talented artist based in Novi Sad, Serbia. With 15 years of experience as a photographer, she specializes in capturing the beauty of nature, travel, and fine art. In addition to her photography, Dunja also expresses her creativity through writing, embroidery, and jewelry making.


Join the Discussion
DIYP Comment Policy
Be nice, be on-topic, no personal information or flames.