Expertly Mask Objects and People in Photoshop Using Color Channels
Jun 24, 2015
Allen Mowery
Allen Mowery is a Nationally-published Commercial & Editorial Photographer with over 20 years of experience. He has shot for major brands as well small clients. When not shooting client work or chasing overgrown wildlife from his yard, he loves to capture the stories of the people and culture around him.
Share:
Expertly Mask Objects and People in Photoshop Using Color Channels
Jun 24, 2015
Allen Mowery
Allen Mowery is a Nationally-published Commercial & Editorial Photographer with over 20 years of experience. He has shot for major brands as well small clients. When not shooting client work or chasing overgrown wildlife from his yard, he loves to capture the stories of the people and culture around him.
Share on:

Before delving into the mysterious world of photography, I started my visual arts career in graphic design and marketing, both freelance and on-staff. One request I became accustomed to was extracting all kinds of objects and people from all kinds of backgrounds and surroundings. Apart from “Make it look awesome,” this seemed to be people’s favorite.
There are many ways to mask and extract objects, and there’s really no “right” way to do it, so long as you find your method of choice effective. However, Aaron Nace of Phlearn (yes, we do seem to love Aaron) gives us an excellent tutorial on making a perfect selection in Photoshop using color channels, magic wand be damned.
In the tutorial, Aaron goes further and provides step-by-step instructions for manipulating your selection into a final work of art, but the truly fascinating part is the selection process at the beginning. This basically entails:
- Selecting a color channel from the channels pallet that provides the most contrast between subject and background.
- Duplicating that layer.
- Ctrl/Cmd-clicking the duplicate layer to generate your selection and then inverting the selection to capture only the darker areas you want.
- Creating a new solid color layer in your layers pallet using the selection as your mask.
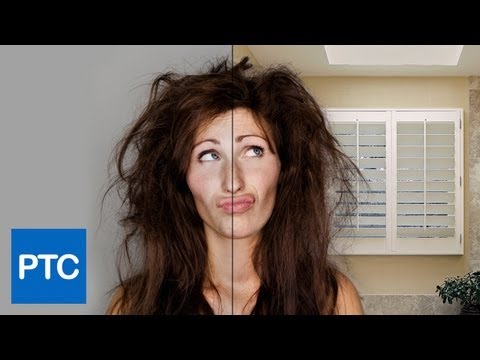
Pretty simple, right? Well, while this technique is great for simple images and graphics, very rarely will you as a photographer encounter such a simple scenario. Things like fabric and hair are particularly problematic. But, you can apply this same underlying technique for much more advanced selections.
In this tutorial, the Photoshop Training Channel goes into much greater detail about properly applying this method for more complex extrications and fine-tuning your results.
So, now that you have that knowledge under your belt, mask away and composite to your devious heart’s content!
[How to Create Perfect Selections Using Channels in Photoshop by Phlearn | Advance Hair Selection Tutorial – Masking Hair In Photoshop by Photoshop Training Channel]

Allen Mowery
Allen Mowery is a Nationally-published Commercial & Editorial Photographer with over 20 years of experience. He has shot for major brands as well small clients. When not shooting client work or chasing overgrown wildlife from his yard, he loves to capture the stories of the people and culture around him.


Join the Discussion
DIYP Comment Policy
Be nice, be on-topic, no personal information or flames.