What is the Exposure Triangle?
Mar 13, 2023
Alex Baker
Alex Baker is a portrait and lifestyle driven photographer based in Valencia, Spain. She works on a range of projects from commercial to fine art and has had work featured in publications such as The Daily Mail, Conde Nast Traveller and El Mundo, and has exhibited work across Europe
Share:
What is the Exposure Triangle?
Mar 13, 2023
Alex Baker
Alex Baker is a portrait and lifestyle driven photographer based in Valencia, Spain. She works on a range of projects from commercial to fine art and has had work featured in publications such as The Daily Mail, Conde Nast Traveller and El Mundo, and has exhibited work across Europe
Share on:

It’s not as sexy as a love triangle and not as dangerous as the Bermuda Triangle. However, the exposure triangle is key to understanding how your camera works. The exposure triangle is also important if you want to nail exposure in a semi-automatic mode or manual mode.
The three things that affect exposure in an image are aperture, shutter speed, and ISO. If you change one of those settings, you must adjust one of the others to compensate. This is where understanding the exposure triangle and stops of light is useful.
[Learn Photography: Aperture | Shutter Speed | ISO | Exposure Triangle | White Balance | Panning | Vinneting | TTL | More…]
Table of contents
What are the three elements of the exposure triangle?
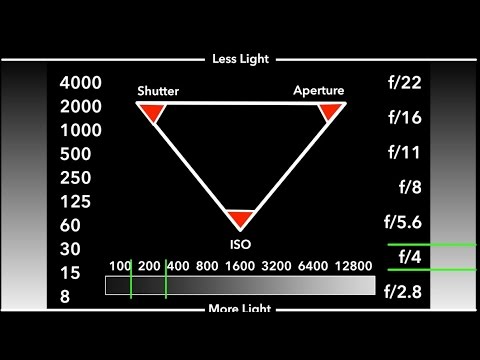
The three components of exposure are aperture, shutter speed, and ISO. These form the three corners of the exposure triangle. When you change one of these settings, you either change the amount of light entering the camera (aperture and shutter speed), or you change the sensitivity of the camera sensor (ISO). In other words, the overall exposure of the image will vary.
We covered aperture, shutter speed, and ISO in earlier articles in this series.
How to use the exposure triangle

The exposure triangle is a visual representation of how the three elements (aperture, shutter speed, and ISO) are interrelated. By changing one of these variables, you affect the overall exposure of the image. In order to compensate and maintain the same overall exposure, you must then adjust one of the other two parameters in the opposite direction.
Let’s look at an example. In very simple terms, let’s say that you take a photograph, but it’s a little bit too dark. However, you want the aperture to be at f/8. You can then choose to reduce your shutter speed by a stop, or you can raise your ISO by a stop.
Similarly, if I have ISO 100, shutter speed 1/125, and aperture f/5.6 and decide that I’d like more depth of field (more of the photo in focus from front to back) and I want to change my aperture to f/8, then I am halving the amount of light entering the camera (minus 1 stop). So to compensate, I must either double my ISO setting to 200 (plus 1 stop) to let more light in OR halve my shutter speed to let more light in (plus 1 stop) to 1/60.
How does the exposure triangle affect noise, motion, and depth of field?

The triangle itself doesn’t have any effect on noise, motion blur, or depth of field. The exposure triangle is merely a visual representation of the relationship between ISO, aperture, and shutter speed. However, as discussed in previous articles, those three individual elements of exposure value have a significant effect on how a photo looks.
To recap, increasing ISO increases digital noise (or film grain if shooting film). This is less of an issue with the latest digital cameras, although I would always advise shooting at the lowest possible ISO value.
Aperture has a direct correspondence with the depth of field in an image. Generally, a wide aperture produces a shallow depth of field. But do remember: the focal length of the lens and the distance of the subject also play a role here.
Shutter speed has a direct impact on the appearance of motion blur in an image. A slower shutter speed will generally increase motion blur, and a faster shutter speed will freeze action.
What is the correct exposure?
You could argue that there is no such thing as a ‘correct exposure’. Rather, the correct exposure is what the photographer intends it to be when taking the photograph.
However, in usual situations, a correct exposure, in simple terms, is a balance between the lightest and darkest elements within the image. The blacks should look black, while the whites should look white without blowing out either end.
The light meter in your camera usually does a decent job of analyzing the distribution of highlights and shadows in a scene. Things get tricky when the scene becomes more complicated. Perhaps you’re going for a lot of contrast with a very moody film noir effect. Or perhaps you’re photographing a polar bear in snow or a black labrador in a coal cellar! These situations quickly become confusing for the camera’s light meter, and it will under or overexpose the image respectively.
Exposure compensation
When you’re shooting in conditions where the light meter could mistakenly over- or underexpose a shot, you need to use exposure compensation.
Shooting a white subject on a white background is often tricky, and you need to slightly overexpose the image to get a good exposure. You can see from the images below that the image on the left is dark and muddy. That is generally how the camera wants to interpret the scene. The image on the right is the ‘correct’ exposure for the scene. Both the cat and the background appearing white yet not overexposed.


When you’re evaluating a scene like this, it helps to be mindful of the relationship that exists between shutter speed, aperture, and ISO. That way, you can quickly and accurately make adjustments in exposure when out in the field to fulfill your artistic vision.
Exposure compensation and semi-automatic exposure modes
If you are shooting in aperture priority mode or shutter priority mode, you can still control your camera settings to let in as little or as much light to get the exposure you want.
In aperture priority mode, you select your f-stop number for the depth of field that you want. Your camera then applies the shutter speed it thinks it needs for the right exposure. However, if you think that the scene needs less light, you can dial in negative exposure compensation.
Similarly, if you’re shooting in shutter priority mode with a fast shutter speed, you camera will apply the aperture setting it thinks is correct. You can still direct it to use smaller or larger apertures if you need it.
Here is a very useful tool for simulating exposure that you can play around with and really begin to understand the relationship between ISO, aperture, and shutter speed.
Test yourself: Use the Exposure Triangle to solve these puzzles
- You are shooting an indoor concert at 1/100 handheld, ISO 400, f/2.8. You are four stops too dark. You are already at your lowest shutter speed and maximum aperture. What should your ISO be?
- You are outdoors on a sunny day, shooting a landscape at f/16, ISO 100, 1/125. Your photo is two stops overexposed. What should you do?
- You’re shooting a studio portrait. However, you last used your camera to shoot an indoor event, and you forgot to change your ISO. You have a perfect exposure shooting a studio portrait at ISO 800, f/16, 1/200. If you wish to lower your ISO to 100 but maintain the same exposure, what would you have to do? (For ease, we will not be considering the impact of flash output on the exposure).
Solutions:
As with anything photography related, there are several different ways to solve each problem. That’s why knowing your stops of light and the exposure triangle is so useful. There’s not just one correct answer, which gives you plenty of flexibility to come up with countless creative options. This is one of the reasons why photography is so much fun (well, for photography geeks like myself, anyway!).
Here are my ideas to solve the exposure problems above. Share your own alternatives in the comment section!
- I always try not to hand hold slower than 1/100 if I don’t have IBIS or IS on the lens. And that’s shooting with a 50mm lens. For this situation, then, the only real solution is to increase your ISO 4 stops to 6400. It could be somewhat noisy, so if you’re serious about concert photography, buy some nice fast lenses with IS and bring a monopod!
- The sunny 16 rule still applies in digital photography. You are already at your lowest ISO, so you can’t decrease that, and you really don’t want to be shooting at a smaller aperture than f/16, or you will get lens diffraction. The only and most viable option, then, is to increase your shutter speed by two stops to 1/500.
- OK, so confession, this is a real-world situation! If you shoot multiple different things, this could easily happen. To solve this one, we first need to know how many stops of light we will be losing by decreasing our ISO to 100 from 800. That’s minus three stops. So we need to compensate by adjusting the aperture and shutter speed. Shooting a studio portrait at f/8 will still retain a good depth of field, so reduce your aperture to f/8. That’s two stops less. Now you can drop your shutter speed to 1/125, which is still well within a good range for the strobe.
Conclusion
The exposure triangle is an easy way to visualize the relationship between aperture, shutter speed, and ISO. These three factors all affect the overall exposure of an image. If you alter one of those, you must also adjust another one to maintain the correct exposure.
There are multiple ways of achieving optimum exposure just by playing around with the three different values. Of course, you are limited to trying to keep the lowest ISO possible, shooting within the correct shutter speed if handheld, and choosing the best aperture to realize your creative vision regarding the depth of field.
Exposure triangle FAQs
The exposure describes the relationship between aperture, ISO, and shutter speed to achieve a ‘good’ exposure.
The exposure triangle is about give and take. What do you do if you are using a high ISO and there is too much noise but the exposure looks right? You need to use a lower ISO and compensate for it with shutter speed and/or aperture. You can try a slower shutter speed or a wider aperture to retain the same exposure. If you reduce the ISO by two stops, you can increase the shutter speed and aperture by one stop each to keep the same exposure.
In full auto mode, your camera will make exposure decisions for you. But in semi-automatic exposure modes you can still adjust the different components of the exposure triangle to get the exposure you want.

Alex Baker
Alex Baker is a portrait and lifestyle driven photographer based in Valencia, Spain. She works on a range of projects from commercial to fine art and has had work featured in publications such as The Daily Mail, Conde Nast Traveller and El Mundo, and has exhibited work across Europe


Join the Discussion
DIYP Comment Policy
Be nice, be on-topic, no personal information or flames.